 By Oliver Awa. Updated Oct 12, 2024. 1st
Published on Oct
12, 2022
Learn more about
Oliver
The IT manager of your new organization wants that you make it easy for the
organization workforce to access resources
in multiple AWS accounts. The organization has five AWS accounts: a master
account (called MasterAcct), two developer
accounts (DevAccount1 and DevAccount2), and two production accounts
(ProdAccount1 and ProdAccount2). The organization
have been using IAM (Aws Identity and Access Management) to federate their
workforce into accounts and business
applications. Now, Management have decided to define federated access
permissions for their users based on their group
memberships in a single centralized directory. As a new admin, you are requested
to implement this in your environments
making show that everything is inline with security best practice .
Example;
Asya and Rayan who are developer have just join the organization and are
expected to have full access to Amazon EC2 and
Amazon S3 in the developer accounts (DevAccount1 and DevAccount2) and read-only
access to EC2 and S3 resources in the
production accounts (ProdAccount1 and ProdAccount2). How do you handle this.
Note:Human users, also known as human identities, are the people, administrators, developers, operators, and consumers of your applications. They must have an identity to access your AWS environments and applications. Human users that are members of your organization are also known as workforce identities. Human users can also be external users with whom you collaborate, and who interact with your AWS resources. They can do this via a web browser, client application, mobile app, or interactive command-line tools.
let’s first define a few key AWS terms that are vital to the subject matter. These definitions are taken directly from AWS
An AWS account is a container of AWS resources. Using multiple AWS accounts is a best practice for scaling environments, as it provides a natural billing boundary for costs, isolates resources for security, gives flexibility for individuals and teams, in addition to being adaptable for new business processes.
An AWS Organization is a collection of AWS accounts that can be organized into a hierarchy and managed centrally. Organizations help to programmatically create new accounts and allocate resources, and simplify billing by setting up a single payment method for all accounts. In addition, AWS Organizations is integrated with other AWS services so admins can define central configurations, security mechanisms, and resource sharing across accounts.
An AWS user is an AWS identity created directly in the AWS IAM or AWS IAM Identity Center admin console that consists of a name and credentials.
A federated user is a user identity that is created in and centrally managed and authenticated by an external identity provider. Federated users assume a role when accessing AWS accounts.
A group is a collection of users. Groups let admins specify permissions for multiple users, which can make it easier to manage the permissions. Any user in that group automatically has the permissions that are assigned to the group. Any user removed from the group will lose those permissions. For instance, if Bob places a new employee into the Engineering group, which has access to the Lambda and DynamoDB production account, then the new employee will also be granted access to the resources in that account.
A role is similar to a user in that it is an AWS identity with permissions and policies that determine what the identity can and cannot do in an AWS account. However, instead of being uniquely associated with one person, a role is intended to be assumable by anyone who needs it. A role does not have standard long-term credentials such as a password or access keys associated with it. Instead, when a user assumes a role, it provides them with a set of temporary security credentials for that session. Admins can use roles to delegate access to users, applications, or services that don’t normally have access to those AWS resources.
A permission set defines the level of access a user has to AWS resources within an AWS account. For Bob, once he provides access to the necessary accounts in AWS IAM Identity Center, he can use predefined or custom permission sets to control the level of access.
AWS Identity and Access Management enables admins to manage access to AWS services and resources within an AWS account securely for what it calls “entities” — IAM users created from the AWS IAM admin console, federated users, application code, or another AWS service. Admins can create and manage AWS users and groups directly, and use permissions to allow and deny their access to AWS resources. Admins create roles to manage access for all other entities.
AWS IAM Identity Center also manages access to AWS services and resources. The difference between AWS IAM and AWS IAM Identity Center is that the latter manages access for all AWS accounts within an AWS Organization, as well as access to other cloud applications, e.g., Salesforce. AWS IAM Identity Center includes a user portal where end users can find and access their assigned AWS accounts, cloud applications, and custom applications in one place.
AWS IAM Identity Center is a cloud service that allows you to grant your users access to AWS resources, such as Amazon EC2 instances, across multiple AWS accounts. By default, AWS IAM Identity Center now provides a directory that you can use to create users, organize them in groups, and set permissions across those groups. You can also grant the users that you create in AWS IAM Identity Center permissions to applications such Salesforce, Box, and Office 365. AWS IAM Identity Center and its directory are available at no additional cost to you.
If you follow the best practices, you are not managing IAM users and groups. Instead, your users and groups are managed outside of AWS and are able to access AWS resources as a federated identity. A federated identity is a user from your enterprise user directory, a web identity provider, the AWS Directory Service, the Identity Center directory, or any user that accesses AWS services by using credentials provided through an identity source. Federated identities use the groups defined by their identity provider and to access an account, they have to assume a role by
A directory is a key building block that allows you to manage the users to whom you want to grant access to AWS resources and applications. AWS Identity and Access Management (IAM) provides a way to create users that can be used to access AWS resources within one AWS account. However, many businesses prefer an approach that enables users to sign in once with a single credential and access multiple AWS accounts and applications. You can now create your users centrally in AWS IAM Identity Center and manage user access to all your AWS accounts and applications. Your users sign in to a user portal with a single set of credentials configured in AWS IAM Identity Center, allowing them to access all of their assigned accounts and applications in a single place.
To follow-up with the Walk-through, make sure the following are in place
Note:Your AWS account must be managed by AWS Organizations. If you haven't set up an organization, you don't have to. When you enable IAM Identity Center, you will choose whether to have AWS create an organization for you. If you've already set up AWS Organizations, make sure that all features are enabled.
To make it easy for the organization workforce to access resources
in multiple AWS accounts
or in order word, to
define federated access permissions for their users based on their
group memberships in a
single centralized directory, we will Use
AWS IAM Identity Center (successor to AWS Single
Sign-On) which is one of
AWS
tools to manage access to the accounts and permissions within
Organizations.
To illustrate how to handle this, we are going to do the following

To add users in AWS IAM Identity Center, navigate to the AWS IAM Identity Center Console. Then, follow the steps below to choose an identity source, add Asya as a user, create a group called Developers and add Asya to the Developers group in AWS IAM Identity Center.
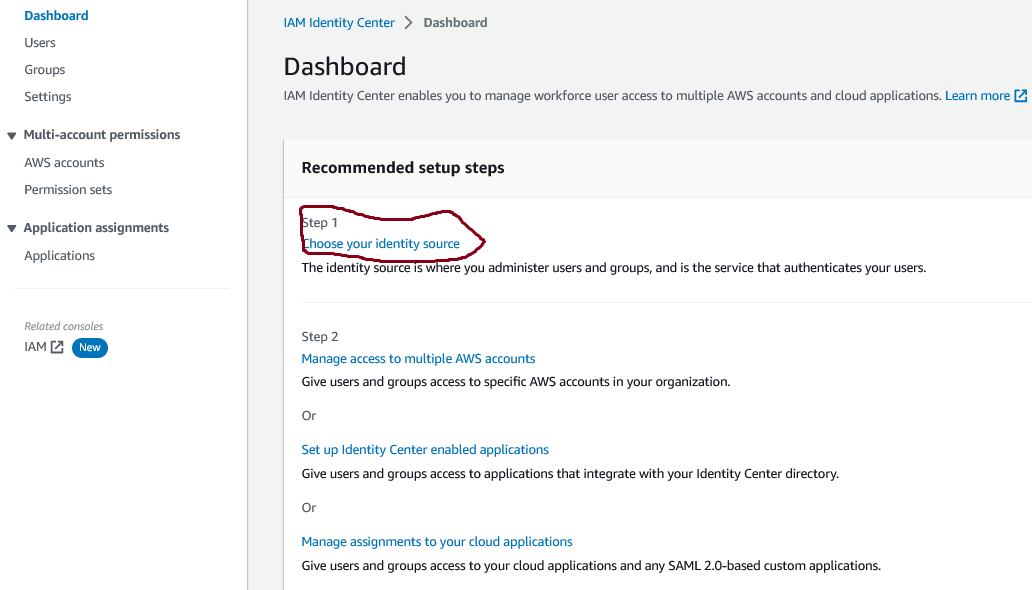
Figure
1: choose your Identity
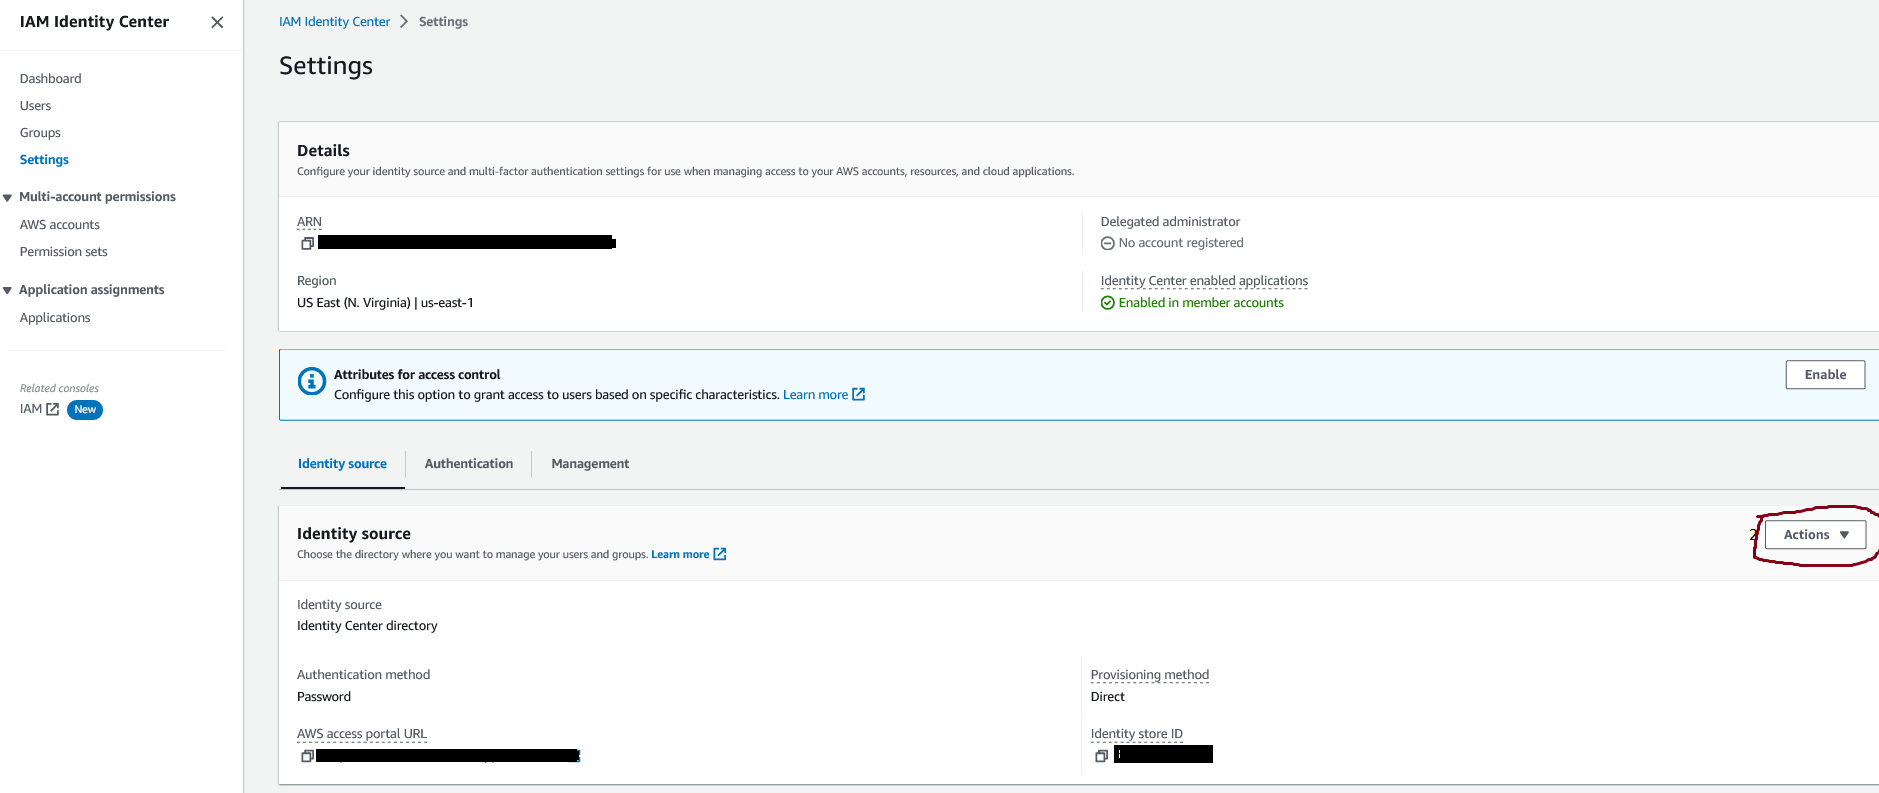
Figure 2: change identity source
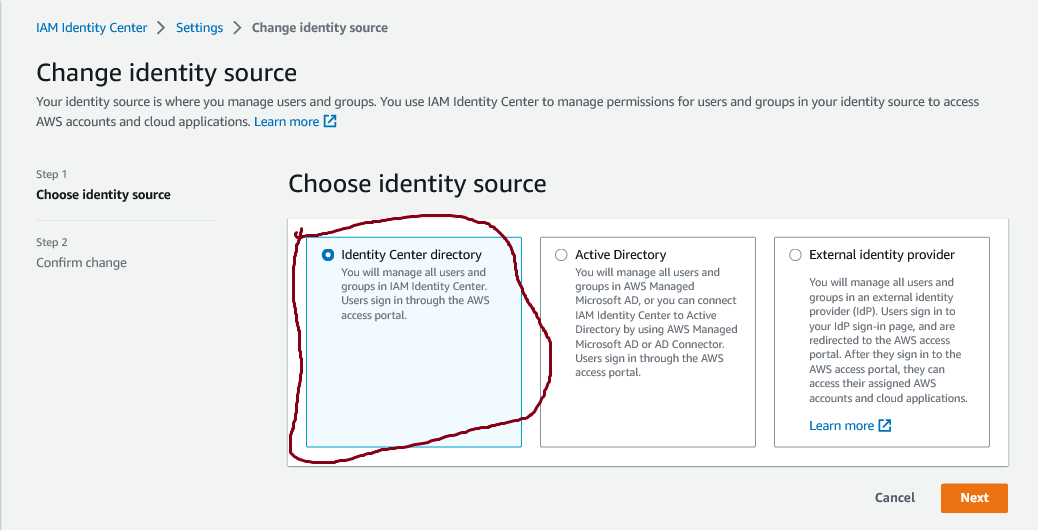
Figure 3: select identity source
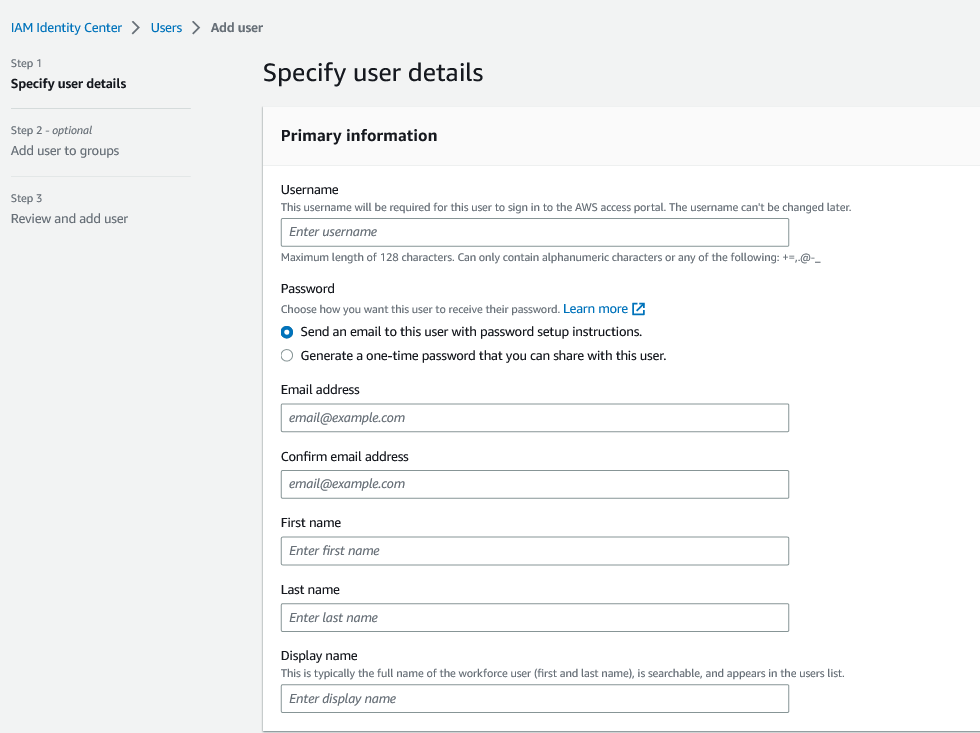
Figure 4: Add user
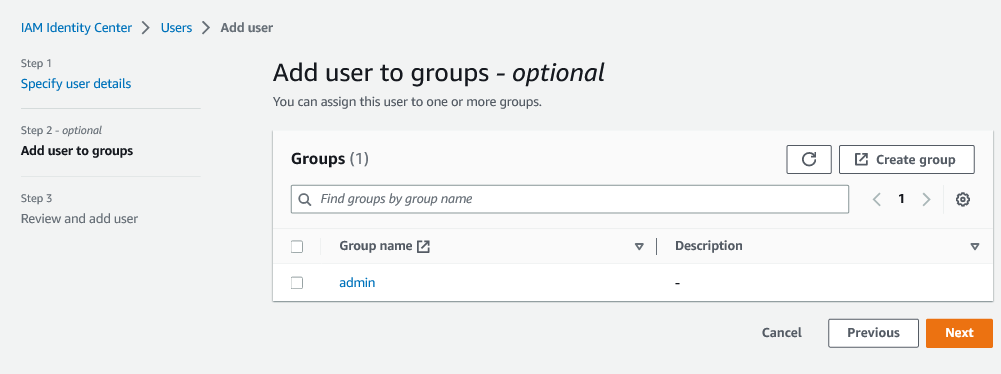
Figure 4: Add user
You’ve successfully created the user Martha and added her to the
Developers group. You can
repeat sub-steps 2, 3, and 6
above to create more users and add them to the group. This is the
process you should follow
to
create the user Rayan
and add him to the Developers group.
Next, you’ll grant the Developers group permissions to AWS resources
within multiple AWS
accounts. To follow along, you’ll
first need to create permission sets.
To grant user permissions to AWS resources, you must create permission sets. A permission set is a collection of administrator-defined policies that AWS IAM Identity Center uses to determine a user’s permissions for any given AWS account. Permission sets can contain either AWS managed policies or custom policies that are stored in AWS IAM Identity Center. Policies contain statements that represent individual access controls (allow or deny) for various tasks. This determines what tasks users can or cannot perform within the AWS account. To learn more about permission sets, see Permission Sets.
For this use case, you’ll create two permissions sets:
Follow the steps below to create permission sets:
On the new tab that open, click on Create permissions set. Picture below

Creating a permission set
The goal of this project is to walk you through the process of setting up a local lab environment on Windows and other OS . After the installation process, we will be creating Linux virtual machines that will be running on your Windows or Mac system and we will be connecting to those Linux virtual machines using SSH. SSH stands for secure shell
We will Create a folder where we want to save all the Vagrant-related files. Since we will be working on different project, we will create a sub-folder or sub directory to host the individual project files.
Vagrant allows you to automatically provision environments, including web servers. In this project, we will use the vagrant box: "hashicorp/bionic64" we added in project 1. part 1, to boot up a machine all together with the Apache web-server. we will then create a simple html page that will be display in the browser.
Performance monitoring and alerting are very crucial to measure the performance metrics of an application running in a production environment. In this project, you will create a metrics collection and graphing system. This will allow you to visually see what the system utilization is for a given host or across an entire environment. You will be installing two popular open-source tools known as Prometheus and Grafana alongside a Node_exporter. You will then use it to monitor servers running in our environment
The goal for this project is to create a centralized syslog server that will allow you to store, graph, and search through the syslog messages from multiple servers. To do this, you'll be deploying the ELK stack. The components of the ELK stack are Elasticsearch, Logstash, and Kibana. Finally, you'll configure servers to send their messages to this new system.